Sunday, December 30, 2012

Winter Jacket, etc.

I changed my mind.  LOL.  The coat/jacket project is back on but I've changed the pattern.  I think I finally am able to put my finger on my issue with that pattern.  I've never really cared for the fit of an armhole princess style.  If I make a princess style, I really prefer the shoulder cut instead.  I should have remembered and not put myself through all the work of that muslin.  So I've put that pattern and muslin aside and have found another newer pattern I'm liking even better.

Butterick 5823 -  I like the seaming detail; it's basically a shoulder princess style.  It's a loose-fitting, lined double-breasted with welt pockets and I've already cut out the tissue and fitted it to Ruby.  As usual, I'll cut the size 16 from the neck through the upper waist and finally end up with a 20 at the hips.  I've added 2 inches in length to each of the pattern pieces.  The sleeve length is fine, its just too full at the wrist so I'll be narrowing down the sleeve so it doesn't look so baggy on my arms.
There's really not a whole lot of shaping going on, although, there are places you could slim it down like the back and side seams.  But that would defeat the purpose of a loose-fitting jacket. 

This really all the progress I have to report today.  I expect to get the coat cut out within the next day or so and actually start putting it together.  It's a pretty straight forward project with no real surprises.

Did you all have a lovely Christmas?  I had a great time with family up north.  Our drive was delayed by that huge snowstorm and we got to see all the idiots in the ditch who just HAD to drive in that crazy weather.  I'll bet I counted over 50 semi's alone off the road along I-80 between Des Moines and Davenport.  And this happens every snowstorm.  You think people would learn to pay attention to weather reports.

Ah well I got one really useful present from the parents; Susan Khalje's Bridal Couture.  I haven't had a chance to dig into it yet but soon.

Later!

Wednesday, December 19, 2012

Burda 7220 - Cowl Neck

I apologize ahead of time for these pictures.  Its so cloudy outside I just can't get a decent shot.  One of these days I'm really going to have to learn more about this camera.  LOL.  That said, I really like this top.  It's very comfortable (I'm all about comfort these days) and easy to make.  I'll be making a couple more in the near future.

One thing to take note:  the sleeves are seriously long.  I took 4 inches off the length and still wound up with 7/8 sleeves.  Not really what I was going for but I'll deal.  LOL.  I made up my normal size 16 at the neck and shoulders graduating down to an 18 at the hips. 

It's cute; it's comfortable and it's easy.  What more could you ask for?  LOL.

There's not going to be much sewing over the next 2 weeks.  We're spending some time with family and I'll be doing lots of cooking.


I hope you all have a very Merry Christmas and be safe!

Later!


Saturday, December 15, 2012

Coat Mojo is gone, gone, gone

With our weather alternating between 40's and 70's (it's supposed to be 68 today), the itch I had to make a coat/jacket has disappeared.  Poof!  I just can't get into it.  Sigh.  I really do need a jacket.  Everything I have is either too casual or too heavy.  Maybe in January I can get the coat mojo working again.

Soooo...I'm ALWAYS ready to make another top.  LOL   I'm working on a new-to-me Burda pattern,7220 view B.  This is a cute cowl neck almost Sewing Workshop type pattern.  It's got a nice pleat in the front and an off center one in the back & a buttoned pleat on each sleeve.  They're using crepe backed satin for their version.  But I have a nice rayon batik from Sawyer Brook that has been marinating for several years in my stash; I think it will work nicely here.  I purchased 1/4 yard of some matching crepe satin for the small tab looking thing in the front and for the sleeve cuff. 

Oh, I thought I would mention since the technical drawings don't show it, but there are darts in this pattern. 

I have the front & back put together and the neckline complete.  It's really looking nice.  You'll have to excuse the summery look of the fabric; it was in the stash.  LOL.

I think by making this 3/4 sleeved, I'll be able to make this a 3 season blouse.  
 Here's a little closer view of the draped front.  It just naturally falls this way; I didn't have to do a thing.  Quite pretty.


And a quick view of the back with that big pleat.  I'm betting this would like nice as a sleeveless top too.

Well this is all I have for now.  I'm hoping to get this finished in the next couple of days.

Later!

Tuesday, November 13, 2012

The Great Pumpkin...Charlie Brown

Okay; don't laugh...at least not too hard.  LOL.  I ran out of regular muslin fabric and didn't feel like running out to purchase more when I have all this old quilting fabric hanging around not being useful.  Sooooo, I used this pumpkin fabric I've had marinating for about 20 years.  I know I got it in Florida.  I remember it being a bit costly at the time, since it had metallic in the design.  I think it cost all of $6.00 a yard.  LOL 

 Pumpkins are apropos for this time of year, no? 


It's a fairly heavy fabric and more able to mimic the wool/cashmere blend I'll be using for the real deal.  I started out cutting the size 18 since I thought the 16 would be just too fitted for me, it just wasn't the case.  When I made it up, the 18 just looked baggy in the shoulder area on me so I re-cut the pieces down to a 16 for the upper body, out to my more normal 18-20 for the hips.   I was so worried my normal 16 would be "too fitted" I caused myself extra work. 

Have you ever done that?  Sigh.

My manikin Ruby is just a touch smaller than I am and there's no help in the photo dept so you'll just have to make do with manikin pictures.  LOL.  I don't know if I want pictures floating around the internet with me wearing pumpkin fabric anyway.  LOL.


Later!


Saturday, November 10, 2012

Butterick 5535 - Coat


This will be the one winter coat I'll be making for the season.  You can still get it, but its on the site as an OOP.  It's pretty simple; semi-fitted, lined jacket with collar, bust darts, patch pockets and princess seams.  I'm going to make the one in the center picture, view B.  Initially I was going to make it from a piece of grey plaid wool flannel I picked up at an estate sale but I really don't feel like matching plaids right now.  So I'm making it easy on myself by using a wool/cashmere blend I purchased at the Cloth Merchants a couple of years ago.  It's at the cleaners getting prepped for sewing.


I will be making a few changes though.  (Don't I always?)  I'll be adding 2 or 3 inches in length.  Since this is a semi-fitted coat, I'm going up one size; I really don't want it THAT fitted.  LOL.  

I'm not a fan of patch pockets so I'm going to try a new technique I found in my Threads archive.  It's called "No-clip welt Pockets".  If you have the archive (or the magazine), it's found in issue #91 on pages 48-49.


It's pretty ingenuous really: you simply fit the double-welt pocket between the seams of a princess style jacket!  I was so pumped when I found this article!  LOL.

Needless to say, I'll be making a muslin to see if going up one size & all the various changes will work with what I need to do to get the fit I'm looking for in this style.  And I'll probably do a practice run on the new pocket. 

Well that's all I have for today!  I hope you're having a nice weekend.

Later!

Monday, November 5, 2012

Grrrrrrrr...

I am not happy!  The Reliable (ha!) V100 iron I purchased in July of 2011 has died an ignominious death at only 16 months of age.  The heating element went kaput.  This happened on Friday morning after my 20 year old serger forgot how to be tense.  I messed with it for over an hour trying to get the tension reset.  I guess there is a burr on a looper or something.  I took it in to B-Sew Inn for servicing and problem detection and brought home a Babylock Eclipse sx to use while I wait for the old one to be fixed.  So I start sewing away and go to use the iron and I'm wondering why it's taking so long to heat up.  I finally figured out it had given up the ghost.  Sigh.  Friday was not a good day for me.  I am now using my backup; a Rowenta that has a leaky tank.  So I have heat but no steam.

Sooooo, anyone have a good iron to suggest that may last more than a mere 16 months?

Later!

Thursday, November 1, 2012

My service project for the year

Each year our guild (Tulsa Smocking & Heirloom Sewing) performs a service for the community.  We make fetal demise gowns for the unfortunate children who don't make it to term.  Each member makes 2 tiny bonnets and 2 gowns (one set for the baby's burial & the other is presented to the parents) which are then donated to an area hospital.

Here's a couple pictures of my completed gowns & bonnets:


Last year my gowns were white; this year I thought blue would be nice.

Later!


PS.  Our groups trip to NYC was postponed.  Oh well, I'd rather go in the spring anyway.

Sunday, October 28, 2012

Lots of stuff goin' on

It's been totally busy here and I feel it's going to get worse until after the new year.  Right now I'm worried our trip to New York will be cancelled with the prospect of Hurricane Sandy.  Ugh!  So we'll just have to see what happens.  If we have to reschedule, we just have to.  Sigh.

There's been a bit of sewing going on.  Just a bit.  I've made a couple of cardigans since it's starting to get a little on the chilly side here.  My sewing room is over the garage so it's always colder in here.  I keep cardigans draped all over the room.  LOL.  The first one I made was the Sewing Workshop's Ann's Cardigan.

I realize the background is pretty busy with but this is where the light is at this time of the afternoon and you have to take it where you get it.  LOL.


It's a nice cardigan.  Believe it or not the length was fine for my 5'8" frame.  I'll warn you though, the sleeves are really long.  This one is a wearable muslin made from a double sided double knit I purchased from FabricMart back when it was on sale.  There is a band sewn from the hem around the neck and down to them hem on the other side.  It's very wide so I cut it in half.  I'll probably make it out of darker fabric the next time but on the whole I like it.

Next up is the Burda cardigan.
I made this one from flocked ponte found at Hancocks believe it or not.  I really, really like this one.  The pattern shows this as being quite short in the back and I lengthened it by 4 inches.  It almost has a peplum effect in the back.  I'm not sure I care for it and I may take that away in the next version.  But I've been wearing the heck out of it.  LOL. 

It's a very easy sew and I know I'll make this again and again.


And finally I've been doing some doll sewing.  I've decided to try to start selling some of my doll clothes on my etsy site again.  This one is modeled by my 18" Madame Alexander girl.  Soon I'll be sewing for my new ball jointed doll (BJD) Agathe.  That should be interesting. 

That's all I have for now.

Later!

Edited to add my Etsy site addy:  www.threadworx.etsy.com 

Friday, October 5, 2012

Yummy...

You know...I'm supposed to be on a fabric diet.  That doesn't seem to be working out for me.  LOL.  I just got these yummy fabrics in from Sawyer Brook.  They have a fabric swatch club you pay to receive.  But I purchase so much from them, I get the swatches for free.  It's called the subscribers exclusive.  Here is a picture of my latest goodies from them.
The yummy red Italian boucle on the right has ribbon as part of the weave.  I'm going to make a jacket of some sort with it.  The print on the left is called "firework" and is rayon.  The hand of this rayon is fabulous!  It is going to be another Liberty shirt.  The black and tan fabrics are twill's with a touch of Lycra and will become matching pants. Sawyer Brook still has some of each left the last time I looked.

I've been retired for almost 17 years (at age 39), and had (and still do) have a hard time not choosing clothes and fabrics that would be perfect for work environment and not a more relaxed home environment.  So, I've decided that since I like nice clothing but have nowhere to wear anything "nice", I will try to dress just a bit nicer for home.  I can't see myself wearing anything other than jeans (or jeans styled) at home since they are so comfortable for me but I can add a little pop to them by choosing colors and patterns that are different than the typical denim.  That's also very "IN" this season too.  LOL.  For once I'm actually in tune with a style.  And I'll substitute my typical hand me down denim shirts from Alan for shirts that actually fit me like the Liberty and nicer Tee styles. 

My question is "do those of you who are retired still have trouble changing your outlook when choosing fabrics or clothes for a more relaxed style?"

That's all I have for today!


Monday, October 1, 2012

I'm a Baaaaad Blogger

Oh dear...things have just been very busy here.  For the last 3-4 weeks Alan and I have been dealing with a sad family event which happened out of the country.  Alan is now out of state dealing with it.  Hence, not much blogging.  But...there has been some sewing. 

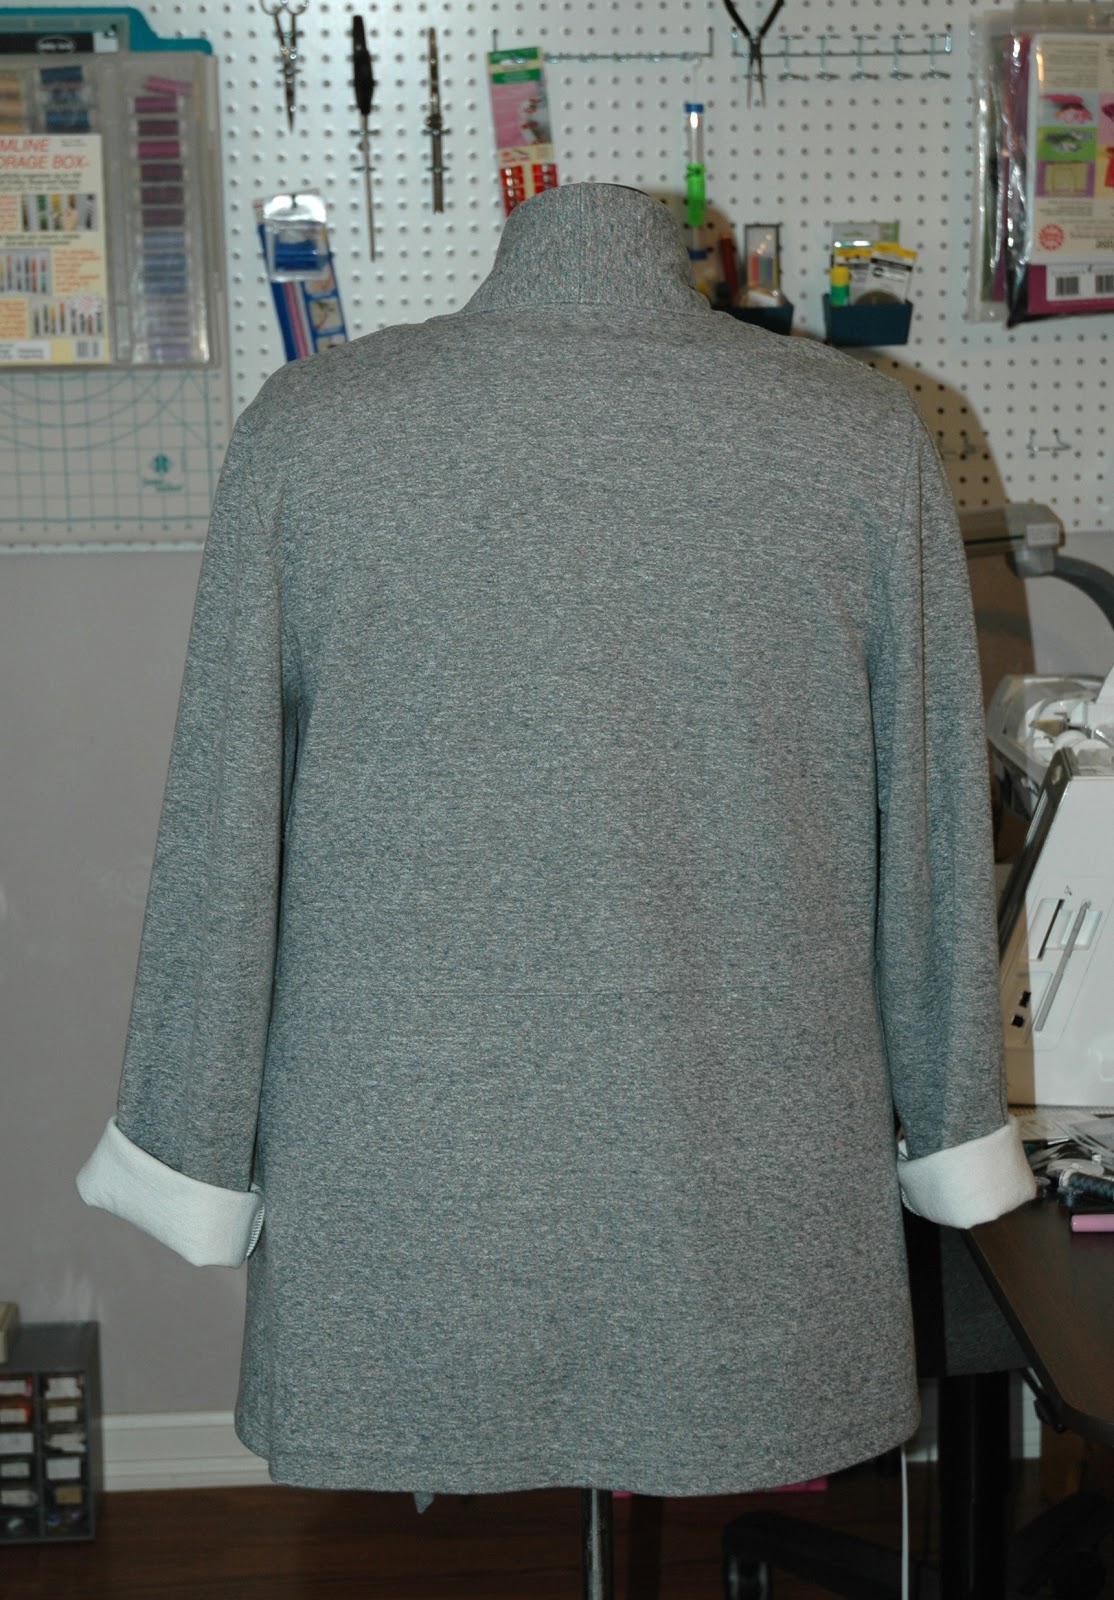
First I attended a  Linda Lee (Sewing Workshop) Liberty Shirt event at The Cloth Merchants.  Loved it; but I felt like the village idiot because I was so slow to get my mind wrapped around doing something backwards.  LOL.  As a consequence, I didn't get much done in class as I would have liked.  For my Liberty shirt, I chose a black chambray linen (for the body of the shirt) and used a lovely Italian cotton print for the flat piping.  This time I chose to bring all of the hems and facings to the front to highlight the lovely cotton piping.  And in doing so, had to hand baste all that lovely piping in place.  LOL.  Here are the results of my efforts.

 I know it can hardly be been, but I did an FBA on the fronts and it hangs much better for me now.  Strangely enough, I didn't have to lengthen this pattern.  It's length is fine.  Weird, eh?

Oh, sorry about the darkness of the pictures.  It's cloudy and I have lightened them. 


I love how my Liberty turned out.  I can wear it either as a light jacket or as a shirt.  I think I'll make a shell to wear under it for the versatility.  I have a nice pair of slim black pants I made (not blogged about) that will go nicely with it. 

My sister, Deb, came to visit last Wednesday and left this morning.  We had a sewing weekend for her.  She's a beginning sewist and still needs a bit of help here and there with her own sewing.  So we made 5 pairs of pants for her!  We used up all the fabric she brought with her.  LOL.  Talk about stash busting! 

And while she was here, I altered a Burda vest pattern to fit her and I'm making it up for her this week.  The striped linen I'm making it from will go with at least 3 of the pants we made.  I'll ship it off in the mail along with the pattern when I'm done.

The weather is finally turning cooler here and we got an inch of rain over the span of a few days.  Good sewing weather.  LOL.

Later!

Saturday, September 22, 2012

Stylearc Victoria continued

I guess I know why there is only one other review out there in the blogosphere for the Victoria blouse.  For the life of me, I haven't been able to put the fronts and back together the way she instructs and have it look halfway decent.  I'm sorry, but I never thought I would call myself anal, but I suppose its true.  LOL.  I've tried 3 times and I finally threw up my hands in surrender.  The points are just too acute and I'm just not good enough to accomplish it to my liking.  Instead I have elected to applique' the front and back yokes to their respective pieces.  I have the back done and am working on getting the humongous front yokes pressed so they can be applied. 
Granted my fabric choice isn't great here but do remember this is a muslin. 

I'm putting it aside for now.  I've lost my mojo for working on it.  Hopefully it will come back.

Or I can try one of the other knit top patterns I purchased and mess with it.  Others have had such good luck with them.

Other sewing news to report is I attended a 2 day Linda Lee workshop at The Cloth Merchants for the Liberty Shirt.  Her trunk show was fun and I took lots of pictures for inspiration.  And guess what!  She had an EMBROIDERED Liberty!!!!!   How cool is that!  You know that's on my list of sewing to do's.  LOL.  Linda Lee really is a sweetie and we all had lots of fun.

I'll report back in another post about the Liberty.

Another bit of news (I don't remember if I've said anything: LOL), 9 members of my OK in Stitches group are going to New York and we're staying in the Fashion district.  We've going to tour the Koos van den Akker work rooms.  Then we're going to raid as many fabric stores as we can in the 4 days we'll be there.  It's been 25 years since I've been to New York.  I can't wait!

Later!

Sunday, September 16, 2012

Remember M6566?


I forgot to show you all the Tee I made from McCalls 6566.  If you'll remember, I posted about making a muslin of this pattern letting you know it was absolutely huge and really sloppy looking.  LOL.  Well I have a fun Tee made from it now and I just love the pattern.  Oh and in case you haven't actually looked at the pattern, it's supposed to be longer in the back than the front.  The fabrics used are a black ITY from The Cloth Merchants and a mesh, zebra, sequin print I found at JoAnn's of all places.  LOL.


I'll be taking this with me on our "OK in Stitches" trip to New York in November.

The funny thing and easy thing about this Tee is that the front is an applique'.  The piece is sewn onto the front and it makes the tee look like a raglan but its not. Fun, eh? 

I can see making a few more of these to fit into my very casual lifestyle.

Updating the Stylearc Victoria blouse:  I've searched all over the web and can only find one other person (Pattern Review) who has made the top.  I find that rather hard to believe.  The blouse has such interesting lines. 

Oh well, onward and upward right?  LOL.  I've moved the bust point down and added one inch to the front and back pieces.  From what I can tell, I don't need to do an FBA.  It looks like there is enough room.  Time will tell I guess.  I'm getting ready to cut it out. 

More later!

Friday, September 14, 2012

The Victoria Blouse...

The Victoria has been calling me.  I can see several opportunities in working with this pattern.  Color blocking and embroidery come to mind immediately.  And you all know how much I love my embroidery.  LOL.  Fairly sheer fabrics are suggested for this blouse but I'm going to move towards quilting cottons for my muslin.  I have some pretty nice quilting cottons and I don't want to put all that work in on embroidery until I have the fit worked out.  I'd like this to be a 3 season blouse and I'm not much for sheers.  I purchased a size 16 and I'm sure I'll have to alter the tissue to make the hips larger.  That's just a given.  I'm hoping this won't get too tricky given the pieces I have to work with.

First up, I'm in the process of tracing the pattern.  I'll be making an FBA and since there are no darts and it's basically a princess front, I'll have to perform a couple of operations.  I use the book Fit for Real People as my reference when making most pattern changes.  So if you have this book, I'll be starting on page 149 with raising or lowering the bust fullness.  In my case, it will be to lower the bust fullness.  Then perform the FBA (full bust adjustment).

This is all I have for today.  I'll report back when I have more completed.

Later!

Saturday, September 1, 2012

Butterick 5611 - with sleeves

I guess it's pretty obvious I like this pattern.  LOL.  I think I've made the sleeveless version about 4 times (a couple of them not blogged about) and it makes a great summer top.  This time I'm making view C, the dropped shoulder version with sleeves.  I'm using a pretty purple & black/navy gingham I got from Sawyer Brook and a couple of coordinating batiks.   I've made several pair of One Seam pants, not blogged about, and a navy pair will go very nicely with this gingham blouse.  The pattern description says very loose-fitting and it's true.  LOL.  I used the same size I cut for the sleeveless version (a 16) and after putting it all together, determined I could use a 1 inch seam allowance for the side/underarm seams.  It's such an easy blouse to make and I had to add a couple of touches from Threads #156 "Simple touches for standout blouses".  Instead of cutting the collar stand apart though, I choose to make my own narrow bias tape to lay across the stand diagonally.  I used a raw edge bias strip to embellish the top of the pocket.  You don't know how against the grain it was for me to use a raw edge.  LOL. 

But it's done now and of course I used my embroidered label.  I probably should have used a purple one but I didn't feel like doing any embroidery.  I just used one of the ones I had already made.  LOL.  Yeah I know, lazy. 


This is one of those things I needed to get off my plate and soon I can turn my attention to one of the Stylearc patterns.  I'm just itching to get one done. 


Okay here are the rest of the pictures:

I'm going to apologize for the funky lighting.  I had to lighten them because I took the pictures on a rainy day.  HUH, imagine that, rain in Oklahoma.  It's been such a rare occurrence over the last couple of years.

Funny, I found an old Chico's tank in my closet that matches perfectly.  It'll never happen again.  LOL.


Here's that fun inside collar stand.


I used the same dark batik on the sleeve tabs.


This is a closeup of the rick-rack stitch I used on the yoke instead of normal top stitching.  I wanted to play around a little. 


That's all I've got for today!  Happy Sewing!

Sunday, August 26, 2012

Bullion Roses...


If you've been reading this blog for anytime now, you'll know I teach sewing to adults.  As I learn new techniques, I pass them onto my students.  Well I'm just crazy over bullion roses, especially when done in buttons.  I've been recommending a book "A-Z of Bullion Embroidery" from Inspiration Books, Country Bumpkin Publications, Australia.  They publish a whole series of books on fine/heirloom sewing. 

It appears the above book is getting very hard to find.  I don't know if they aren't publishing it any longer or what.  There are very few people who have published tutorials on bullion embroidery but I follow another blog La Sewista! aka Bunny, who does wonderful heirloom sewing and she has many tutorials on her blog site.  I found one for the bullion stitch which might help those of you who couldn't find the book.  Here is her addy  http://lasewist.blogspot.com/2009/08/hints-for-bullions.html


Now my bullion's aren't perfect; they are a work in progress but I figure if you get that close to me to see they aren't perfect - YOUR TOO DANG CLOSE!   LOL.

They can be a beautiful, unexpected touch on an otherwise plain shirt or blouse.  You would be surprised how many women have asked where they can purchase the embroidery design so they can machine embroider it.  LOL


You'll have hours of wonderful reading on Bunny's site.  I know I did.  Check it out!


Thursday, August 23, 2012

I'm not in Love

Sigh.  I know; not a good start when you see that.   Well, I mentioned in the previous post that I had a couple of things to get off my plate before I could start one of the new Stylearc patterns that had arrived.  I have been dying to make Sewing Workshop's Icon shirt.  One of the girls in our OK in Stitches group made it up and wore to one of our meetings and I just loved it on her.  Here I thought "Ok girl you're getting out of your comfort zone and trying something different".  I should have known better. 

My first problem was trying to figure out how to tissue fit the dang thing.  This blouse has 11 pieces!  A right front, a left front, a right back and a left back; plus a left back extension.   Sheesh!  So I kind of muddled my way through it and decided on a medium.  It really looked like it was going to be fairly big and I would just be able to take it in where needed.  Because EVERY piece is different, you must cut it out on a single layer of fabric.  Ugh!  This was starting to be way too work.  I decided to use a soft blue chambray that's been in my stash for a few years.  I think it's from JoAnn's. 

Here are my pics.  I'm not quite done; still have the buttons to sew on but this is it.  I'm not sure how much I'll wear this or if I'll even make it again.  I think it's going to be one of those shirts that always need constant arranging & adjusting and frankly, that's not my cup of tea. 


I did lengthen all 5 pattern pieces by 2 inches to get a length that would work with my height.  I didn't like how long the back pieces were when they were finished.  The proportion just didn't look right to me.  So I wound up taking the 2 inches out that I added in the beginning.  And, of course had to make all those mitered corners AGAIN.  This blouse is a lot of work what with all the top-stitching and mitered corners.  And I found that a couple of the pieces were only laid over the top of other pieces (the back and the left side extension), not making the tuck that it looked like in the tech drawings.


Here's the back after shortening.  And as you can see, I did add a little light stitching designs as my fabric was so plain.  Dandelions blowing in the breeze.  LOL. 


This picture is the inside of the left side extension.  It's my save for the shirt.  The hips wound up being too tight so instead of the simple overlap the pattern directions wanted I choose to angle it out and sew it down again by retracing my top stitching. 

I'm disappointed.  It's a nice shirt but just not a style for me I guess. 

Later!

Saturday, August 4, 2012

Stylearc Patterns are here!

It's been a very busy week what with celebrating birthdays, embroidery club, finishing items for upcoming deadlines (still not done with that), and teaching.  So when my patterns arrived, it was a welcome diversion.  So without further ado, here are my choices:

I thought this top had lots of color blocking possibilities.  Not sure about the pockets on the hips, but a princess-line Tee is pretty cute.

I LOVE the look of this Tee with a built-in cami.  I will probably make it not so form-fitting as I just don't need everyone to see my lumps and bumps.  LOL.
The Suzie was my freebie.  It has possibilities.  You can make this as fitted or as loose as you please by just not using the darts.
I have been drooling over this blouse ever since I found Stylearc.  I see color blocking here and also (a real biggie for me) I see lots of embroidering going on with this one.  Tone-on-tone embroidery on the yoke and front panels.  Yum!

I was really intrigued with this style pant.  The side seams are moved to the front of the pant.  Cute!  I think I'll have to have several pair to wear with some the of tunics I plan on making. 

This pattern could even double as winter cycling pants if I can find the right fabric.

So, what do you think?  Have any of you made the Stylearc plunge?  And what did you think of the one size in the pattern?  I ordered my typical size 16 fulling expecting to make room for my hips.  I ordered an 18 in the Wallis pant.

That's all I've got for today...

Sunday, July 29, 2012

More Guild work


Along with the little AG bed I've made, I'm also donating a little outfit to the guild effort at funding education.  It's a really sweet set of patterns from a new ( to me) pattern company I've found called Liberty Jane.  They produce modern American Girl clothes patterns.  I purchased a few and made up this little outfit from some jean scraps I had leftover from making last years embroidered vest.


First came the little skirt with the lace peeking out.   I only had to purchase lace for this one.  It was very easy to make up.  The Liberty Jane patterns are very well thought out and are illustrated with lots of pictures of every step.  Since I'm an experienced sewist, they were very easy for me.  I think a beginning sewist would have no problems.  They actually seemed to be geared towards the beginning sewist too.
This little tee turned out so cute!  I had to change it up just a bit though.  I regularly go thrifting around town and look for baby/toddler clothes that I think I can re-fashion into doll clothes for the guild.  This was a toddler tee shirt.  I removed the neckband then cut out my pattern.  Then re-applied the neck band.  It's in perfect scale for the tee!  When I had the tee all made up, I applied a small crystal iron-on design.  Oh and I used my coverstitch to do the hem.


And last but not least was the matching vest.  Now the pattern company wants you to line it, but I didn't.  I used my serger to put it together.  Also a hammer comes in quite handy to pound those thick seams into submission.  LOL.  Also good for the frustration factor.

I'm really happy with how it turned out.


Later!

Monday, July 23, 2012

Kwik Sew 3801 & Color Blocking


I just realized that I'm probably the most boring sewist.  I just keep making the same things over and over again.  But isn't that the purpose of a TNT, something you would make over & over again?  Well this Tee shirt is certainly a TNT for me. LOL.

This pink flowered version has become a real favorite with me.  I've already worn it twice and its only 2 weeks old.  In fact, I had to dig it out of the dirty clothes hamper to take a picture.  LOL.  I know Carolyn (Diary of a Sewing Fanatic) and I purchased this fabric from Sawyer Brook at the same time but I don't think she made it up yet.  I sure love this one!


To explain the next few pictures, I'm a member of a garment sewing group, here in Tulsa, called OK in Stitches.  We meet once a month, have a program and there are 4 challenges a year.  The first deadline is coming up for our August meeting.  The challenge is called Slice & Dice.  Choose any pattern and slice it up to create your own design using multiple fabrics, trims or a single fabric with seam details.  I choose KS3801.  I've really been wanting to color block for some time now and this gave me the perfect opportunity.

The first thing was to trace off the pattern - TWICE.  Since it was 2 pieces placed on the fold it was necessary to trace it twice and tape it together.  Then I had to figure out how I wanted to cut it apart.  I thought cutting almost at the neckline and diagonally down to the hip would be the most flattering.  So I sliced it at 2 points which you see in this picture to the right.  To avoid later confusion, I wrote "this side up" and "hemline" on the two pieces furthest to the right.  I could just see myself serging all the wrong pieces together.  LOL

Gratuitous hanger shot.  LOL.  Sorry about the pics; you all know how hard it is shoot pictures of garments with black in them.


Here it is on Ruby.  Following will be pictures of each side, because each side of the Tee are different.


Obviously the back.


Left side.


Right side.


In this shot, I wanted you to see how well I matched up the seams and how the print just flows over the shoulder.

I'm very pleased with the Tee and may well do it again in the future.