Friday, December 31, 2010
Thursday, December 30, 2010
Leopard Jean Jacket - Sleeves

Tuesday, December 28, 2010
Leopard Jean Jacket - On Seam Pockets

Wednesday, December 22, 2010
Leopard Jean Jacket - Back
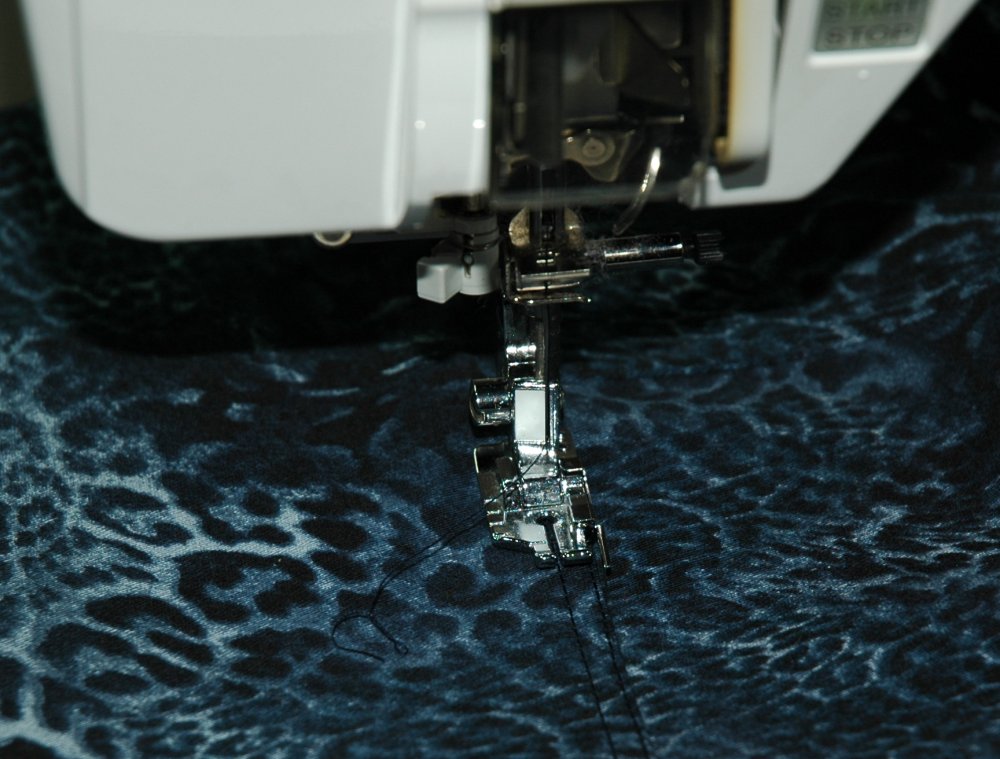

Pictured here are my favorite feet to use: left is the 1/4" foot with guide and on the right is the edge join foot. You get really nice, even top-stitching for seams.

Here's a picture of the back all assembled. Sorry the picture is so dark. There's just not enough light in my sewing for really good pictures. Remember you can click on the picture to enlarge it. The pattern of the fabric is really pretty when you can see it clearer.
I just LOVE this fabric. LOL
Monday, December 20, 2010
Leopard Jean Jacket - Tissue test fit

I just traced out and test fit the front of the pattern on some old sew-in interfacing I'm trying to use up. Its test fit to the front of my dummy. I'm in the process right now of cutting out all of the pattern pieces and then I'll start to layout the fabric and get those pieces cut out too. Depending on how things go, it could take me a day or two to get it done. This pattern is sized by XS-S-M-L-XL. I cut a medium up top and graded down to a large in the hip area which are my usual changes.
Sunday, December 19, 2010
Leopard Jean Jacket - KS2895
I was roving around the other blogs I follow and stumbled across a jacket challenge. I'm going to try to follow along; I don't think I'll be able to make the 12 jackets (1 a month) but I hope to complete a few. The first will be a jean jacket in a cool leopard denim print I found at our local fabric store theclothmerchants.com
 I'm going to use Kwik Sew 2895 View A. Neither view has on seam pockets nor is it lined so I'm going to add pockets & lining. Here's a picture of the pattern and my fabrics. Obtw, I purchased the lining at Jo Ann's. Just finished washing up both of them. I hope to get started sometime today tracing out the pattern. I'm going to get my bike ride (12 miles) in and then we'll see.

Leftover fabric...


This last photo shows the completed top. I had a bit of trouble trying to get the "V" part of the binding right. The directions in the pattern were awful for installing the neck binding. So I had to wing it. LOL. Either I need more practice doing this particular technique or I need to avoid it by making round necks.
Saturday, December 18, 2010
Xmas Mojo got up and went...
At least for this project, UGH, I have been trying for days to make this shirt work. I think I'm going to put it aside for now when I have more inspiration working for me. I just can't seem to get my head to concentrate on it. My mind keeps wandering to other projects. Sigh. So like me. LOL.
Sunday, December 12, 2010
Christmas Blouse

I've been toying with the idea of creating a Christmas themed blouse for some time now. Yeah...I know; I've procrastinated quite a while with it. I've been trying to work out the details in my head and its not going that well this time. So I figure I'll just get it out and try playing around. Its going to be based on the Threads Gender Bender shirt from issue 150 and the fabrics I've chosen are LOUD. LOL. This pretty much the idea I used to make the ladybug blouse. I've collected the fabrics and have done a couple of test embroidery ideas. First the pattern I'll use is my TNT Kwik Sew 3555. I've made this twice now and really like the fit and how simple it is. Plus I really like the tailored look of shirts. I'm just a shirt and jeans gal at heart.

These are the fabrics I've collected for the shirt. I warned you; they are very bright. lol.

These are a couple of ideas I had with embroidery for the front pocket. The first would be a white pocket on the front of the red & green stripe fabric that will be the body of the shirt. I brought the holly design into Designer's Gallery CustomWorks II and then added a couple of satin stitch lines with the aid of QuiltWorks which I have installed as a tool under CustomWorks. I'm not sure I like it yet. I may have to play around with it some more.

This second sample is the same fabric the body of the shirt will be composed of and I was just seeing what I thought of the holly design against it. I kind of like it. Its rather subtle, but what does subtle have to do with LOUD colors. Grin. But I'm thinking I like the white pocket more.
The reason I'm messing with the embroidery first is because the pocket is one of the first things you sew on the shirt. I'm also thinking of using the holly design on the inside collar stand on white fabric. That way you'll actually see the fabric when the neck is worn open, which I most always do. We'll see; so far its just a thought.
I think I'll wrap a few presents and think about this for awhile. LOL. I'm procrastination at its best.
Saturday, December 11, 2010
Threads Prize Package!

Sandra Betzina - V1085

I've been thinking of sewing more knits for winter and rediscovered this pretty fabric in my stash. Its got 4 way stretch and is a nice sweater knit.
I have purchased several Sandra Betzina patterns in the past but haven't had a chance to make any of them up yet. Well yesterday I finally got to it. I prewashed the fabric and laid it out on my cutting table to let it "relax". Its pretty stretchy so I let it lie for 24 hours. The pattern for the shirt I'm making is V1085 and I made the cowl neck view A, show below in the grey and white stripes.

I took Sandra's Fit Class when she came to Tulsa early this year (before I lost weight) and had to change the Letters for size. I chose D for the bust and graded up to an E for the waist and hip area. I like shirts to "skim" my waist and hips; not cling tightly like the styles reflect now. I just don't think showing how many rolls you have around the waist is attractive, I don't care how young you are. Just seeing all these young girls showing all that fat around the middle is sad and shows how out of shape America is and how most are a slave to fashion. There, I said it. I'm off my soapbox for today. LOL.
Okay, back to sewing. I found the pattern directions very good. I followed them for the most part. I used the needle requested for sewing (70/10HM) and a narrow zigzag of 1.0mm width & 2.5mm length. I attached the raglan sleeves to both front and back then tried it on for fit. It mentions in the pattern there is one inch seam allowances on the side seams for "fit". I found Using 5/8" was just right for me. Once I determined that the fit was right, I sewed more seams and serged them all for a nice finish. I used my cover stitch machine to hem the 3/4 length sleeves and the hem of the garment. Oh, let me mention I reduced the length by 1 inch and gave it an 1 1/2 inch hem. The pattern suggest 5/8" for a hem. Let me say that was way longer looking than the picture on the front of the pattern showed. The last thing you do is attach the band for the neckline. That was really easy. You also create a little pouch for a weight to keep the neckline in place. All in all, I really love the top and have been wearing it since it was finished. I'd recommend it to others and I'll make a couple more myself. Here's a picture of me wearing the finished top. I love it!

And here is a close up of the neckline area.

Friday, December 10, 2010
Infinity Scarf...
I've been on a knitting kick lately. Everyone is getting a knitted scarf for Christmas. LOL. Even me. Thought you might like to see this one. It's my first attempt at an infinity scarf. A very easy pattern of k4, p4 with a k1,p1 border. This ought to go with my coat pretty nicely.

All I have left to do is twist it and sew the edges together to create the "Infinity" effect.

All I have left to do is twist it and sew the edges together to create the "Infinity" effect.
Wednesday, December 1, 2010
Inspired by Threads Contest winner!

I won!!! How cool is that???? LOL. My shirt "Candlewick N Roses" won the contest. Thanks so much for voting for my shirt! I know I'm late in getting this announcement out, but whooiee, its been busy here lately! This the first time I've ever entered a contest with any of my garments. That's the winning shirt above.
And here is the addy to see the winner announcement at Threads on-line. http://www.threadsmagazine.com/item/17086/and-the-winner-of-the-inspired-by-threads-contest-is
I'm still on cloud nine... LOL
Sunday, November 21, 2010
Falling Leaves - Finished!!!
Well I finally got to sit down and finish Deb's runner. I've collected a lot of Jenny Haskin's books and designs ( I swear I'll make one of the quilts one of these days.) LOL. And I really like how she joins the blocks. You put all 3 layers together (top fabric - batting - backing), embroider your design and quilt it however you like and then cut it to the correct block size. You then take 2 of the blocks & using an edge join foot on your sewing machine, you zigzag them together. She calls it the "Jenny Join". Here is a close up on a test block.
 Below is a picture of 2 of the large blocks joined by zigzag stitches.
 When you have your blocks joined in this manner, you then choose a decorative satin stitch to cover the zigzag stitching. You load the bobbin with the same color thread you use in the needle. And it looks like this.

Looks nice doesn't it? LOL. Now we have the completed project with the binding sewn.


Looks nice doesn't it? LOL. Now we have the completed project with the binding sewn.

Wednesday, November 17, 2010
Service Project...
I'm not sure I've mentioned it before but I'm a member of the Tulsa Smocking & Heirloom Sewing Guild. Our service project of giving back to the community is making a pair of fetal demise gowns for those families who loose a baby at birth. Each member of our guild work on these sweet, tiny gowns. Some smocking their gowns, others embellish their gowns with shadowwork embroidery or in my case, the gown is machine embroidered. We each make 2 gowns that are alike. One is worn by the child and the other is given to the family in a lovely memory box with the child's footprints. It's a very nice outreach that is offered to families at such a sad time. I just finished my gowns and thought you might like to see a picture of them.

Here is a close up of the embroidery.


Here is a close up of the embroidery.

"Inspired by Threads" Contest
About a month ago I entered 2 garments, shirts, into the "Inspired by Threads" magazine contest. Both shirts are featured here on my blog. They were the Ladybug sleeveless top and the Candlewick N Roses long sleeve shirt. We had to say which Threads article was our inspiration for making whatever project we made. For the Ladybug shirt, Threads issue 150 "Whimsical Ideas for Fresh, Fun Blouses" was my inspiration. In making the Candlewick N Roses blouse, Threads issue 140 "Three Takes on the Classic White Shirt" got the creative juices flowing. The editors chose the top 5 candidates and both my shirts made it! And then everyone was asked to vote for their favorite! Guess what? My Candlewick N Roses shirt won! How cool is that? I've provided a link below so you can see the article at Threads magazine's online site.
http://www.threadsmagazine.com/item/17086/and-the-winner-of-the-inspired-by-threads-contest-is
http://www.threadsmagazine.com/item/17086/and-the-winner-of-the-inspired-by-threads-contest-is
Sunday, November 7, 2010
Falling Leaves part 3 - The Idiot can't measure
Gah!!!! I thought something looked just wrong with my runner. Well...I was so focused on getting the width correct on my pieces I FORGOT ALL ABOUT THE LENGTH! So instead of being around 26 X 48 its going to be 26 X 32. Way shorter than I wanted. I don't have enough fabric left to re-cut and re-embroider because its from my stash and is about 20 years old. I'll just have to make do with the piece as is. You can picture me kicking myself for having my head in the clouds.
Another reason I'm a little off is that my dear friend Elaine is moving from Tulsa to Tampa/Houston. Her husband has been transferred and they will live in Tampa full time and visit their family in the Houston area. We met while attending the Embroidery Club meetings at B-Sew Inn and hit it off. Elaine and I both love heirloom sewing and took smocking classes from Silvia (Delicate Stitches). Elaine you will be missed alot.
Another reason I'm a little off is that my dear friend Elaine is moving from Tulsa to Tampa/Houston. Her husband has been transferred and they will live in Tampa full time and visit their family in the Houston area. We met while attending the Embroidery Club meetings at B-Sew Inn and hit it off. Elaine and I both love heirloom sewing and took smocking classes from Silvia (Delicate Stitches). Elaine you will be missed alot.
Falling Leaves part 2
I've finished embroidering the 2 strips of black fabric with the lacy leaf designs. Here's a picture of what I've done so far. Yeah...I know my picture taking skills need a little brush up. LOL. I promise; I cut and draw straighter than this picture shows.

Now I need to decide how I'm going to quilt it. I'm pondering using embroidered quilting for the large areas on the middle and border pieces that will be attached to those above. I'm taking a free-motion quilting class on Monday morning to brush up on those skills. I'd like to free-motion the leaf embroideries. I'm still thinking about it.

Now I need to decide how I'm going to quilt it. I'm pondering using embroidered quilting for the large areas on the middle and border pieces that will be attached to those above. I'm taking a free-motion quilting class on Monday morning to brush up on those skills. I'd like to free-motion the leaf embroideries. I'm still thinking about it.
Wednesday, November 3, 2010
Falling Leaves Runner for Deb
 My sister Deb wants a runner for her new coffee table for Christmas. I've come up with a design and she's shopped my stash. Here are the fabrics she chose.
Here's picture of the design I came up with and how I want to use the 2 fabrics Deb chose. Its a pretty rough drawing but I just wanted to get it down on paper to better visualize it.

I've cut out the pieces I need for the black fabric that is going to be embroidered with leaves. I've given the pieces an extra bit of fabric at each side for some shrinkage in the embroidery and quilting. Below is a picture of the cut piece adhered to the batting with KK2000. I've also drawn my center line and used my 5 X 7 hoop to draw the 2 outside lines pictured. I know its a little hard to see the markings but you can click on the picture and it will get a bit bigger. But you'll get the idea of what I'm trying to achieve.

Next, I've laid out the templates for the leaf designs in the places I'm going embroider them. I'll mark the positions and do the embroidery.

Tuesday, November 2, 2010
Happy Holly Days!
Yes I know I've been pretty slack with no posts for over a week. But...I have been sewing & I've finished another project, this time for my Etsy shop. I love making table toppers. Some might find it tedious but I really like planning and laying out the designs. And...I have about a gazillion designs and probably won't use them all in my lifetime. LOL. And with the Christmas holidays coming up, I thought using some pretty holly designs might be nice. The designs used here are from www.hatchedinafrica.com and called Elegant Holly. I'm now working on a quilted topper for my sister's coffee table, but I'll be making another topper shortly - black fabric with bright poinsettia designs. I'll outline my whole process and what products I've used to acheive these results. Here are pictures of the topper. Enjoy!


Monday, October 18, 2010
Knit Voyage - Destination Complete!

Wednesday, October 13, 2010
Knit Voyage - Nightmare no more!!!!


Knit Voyage or Nightmare?

Tuesday, October 12, 2010
Knit Voyage - Embroidery design test 2

Again, you can click on the picture to get a closer look. These designs come from Susan Glen and can be found at Susanglendesigns.com.
Knit Voyage - Embroidery design test

I know the picture is dark, but this one is lightened several times and if you click on it, it does show up much better.
If you're not familiar with embroidering on a sticky, wash away stabilizer, here's what I had to do. Lowered the presser foot to .5 and change to a metalic needle (larger scarf for the thread to pass through).
Monday, October 11, 2010
Presentation at B-Sew Inn of Tulsa
The Scattered Sewist (me!!!) has been asked by our local B-Sew Inn, which is the largest Babylock dealer in the country, to give a presentation (this Thursday the 14th) on how I use embroidery in garment making. How Cool is that! I've been informed B-Sew Inn feels they been a little narrowly focused on just embroidery and not enough on other aspects of these super versatile machines. As such, feel they would like to put more emphasis on garment making of all kinds. This is where I come in. LOL. As you all know, my passion is garment making. I'll be bringing 4 or 5 garments I've made that all have embroidery of some type added to the garment while under construction. I'll be bringing a Trench Coat (lined), 2 Shirts, a lined Vest & an heirloom baby dress made of batiste. I'll bring the patterns and the samples I made while testing. I'm soooooo nervous! LOL.
Sunday, October 10, 2010
Knit Voyage 3 & Butternut!

Saturday, October 9, 2010
Knit Voyage - 2

Friday, October 8, 2010
Knit Voyage

Wednesday, September 29, 2010
I'm in Iron Hell...
I don't what I must have done in a past life, but I need yet ANOTHER new iron. Ugh. I had a Rowenta Advancer ( hated the automatic shut off ) but dropped it one time too many. Now I have a Rowenta Focus. Its been fine for about 8 months and now the tank is leaking up towards the front ( whether I use steam or not ). That makes 3 irons in 3 years. I'm afraid to use it on whites now. I swear I haven't dropped it once. Really. LOL. So I begin the search for a new one. GAH. I think I may have to graduate to a new system.
Wednesday, September 22, 2010
Candlewick & Roses...Done!!!

Well...it took me a couple of days to finish the buttons and buttonholes. Did the buttonholes first. Btw, did I ever say I always embroider my buttonholes now? Oh gads! Its sew much easier! Then I marked the corresponding locations for the buttons. Don't you hate it when you purchase a great blouse and then it gapes in the front? Grrrrr. Ever since I started noticing that happening, I've been moving the dang locations for buttons. Now no more gaping.
This really is a great pattern. I can see myself making this several times before getting bored with it.
Each button has a rose bud hand embroidered into it. I thought adding this bit of hand embroidery made it touch more feminine without going over the top. I really hate phoofy. Is that even a word? LOL.
Tuesday, September 21, 2010
Candlewick & Roses

I've added the collar and sleeves with the embroidered cuffs. Cute, cute, cute.
Here's a picture of the shirt so far. You can click on it for a closer view.

Sunday, September 19, 2010
Take a break with an Angel...

Thursday, September 16, 2010
Candlewick...

And yes I've made it in white, but its a really lovely fine herringbone weave 100% cotton shirting I found with our lovely ladies at the Cloth Merchants. These ladies provide us with our only local outlet to finer fabrics. Here in Tulsa, we're pretty limited in fabric availability. I'm very lucky I'm not totally stuck with just JoAnn's and Hancock Fabrics.
I'm sorry the picture of the pattern isn't better. I had to pull it from Simplicity; everytime I tried to take a picture of my pattern, the shiny paper they used totally flashed out with my camera. And I don't know enough about the dang camera to turn the flash off. But you can at least get the idea with what I've shown.
Okay...right off the bat, I've made a few modifications to the pattern. The view I choose ends at the high hip. I added two inches for a mid hip length. Also, I don't like any of the cuff variations shown in the pattern; I prefer a regular cuff. So I borrowed one from another pattern. LOL. This particular pattern has included different pieces for each cup sizes. So I selected View A size C. I've also decided to embellish the bib & cuffs with embroidery. So I shopped my extensive embroidery design collection ( I'm addicted) for something appropriate and settled on a set of candlewick designs I got locally at a quilting shop that sells Pfaff machines and designs.

I know its a little hard to see, but if you click on it, you'll get a larger picture hopefully be able to get a good idea of the look of the design. Here is a sew out of the design I chose. Actually, its the design repeated twice, one right next to the other. I love subtle, white on white, etc. This piece is going to be a cuff. I did what I normally do when adding embroidery to a project. I take the pattern piece and make an outline of it with wash away blue pen and cut it out with enough fabric around to fit in the hoop. Except, I almost never hoop anything. I hooped sticky wash away stabilizer in the hoop and positioned the fabric on the hoop. Embroidered the first design. Removed it from the hoop. Cut off the excess stabilizer (keeping the leftover pieces for odd small designs). Hoop another piece of the same stabilizer and with the use of a printed copy of the design, positioned it on the sticky. Embroidered the second iteration of the design. In this fashion, I made embroidered fabric for the 2 front bib pieces and 2 cuffs.
So far, I've got the darts sewn, fronts contructed, fronts attached to the back and a very narrow hem. Here's a closeup of the bib.

And here's a side view.

Subscribe to:
Posts (Atom)